T hole surgery
‘T’-hole surgery
By Chris Wilson
Sometimes a stealthy presentation is the best approach when targeting big fish that have probably seen it all before, and what better than to present a decent size piece of meat or cheese on the hair with no visible signs of a bait stop showing?
For soft bait like these it’s important to use a big enough stop so they don’t rip or tear the bait apart when you cast or when holding back in a flow.
This article will focus on the ingenuity of two new products from the LaGuna camp namely;
the sPUNCH™ All-in-one baiting tool and the remarkable versatility of SPLITSTOP’s™.
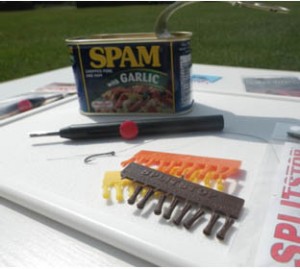 SPLITSTOP’s™ are 8mm bait stops which is a really good size as they provide the strength needed to keep your bait on.
Apart from their large size and those curious splits on each end…
There seems nothing immediately obvious or extraordinary about them at first glance, after all a bait stop is just, well, a bait stop isn’t it?
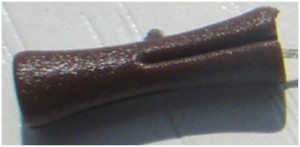
They look similar in some ways to other stops but SPLITSTOP’s™ are perfect as they can be used in a number of different ways; either as a dumbbell attached by a hair loop just like any ordinary stop or transformed into a meat stop by partially opening them out like this.

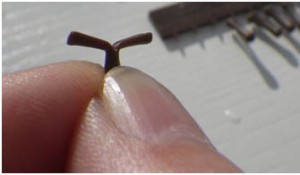
But the best way by far is to completely hide them inside the bait so that we don’t arouse any suspicion from the fish who might wish to inspect our bait when it’s in the water, and for this particular operation we’ll also be using the sPUNCH™ all-in-one baiting tool from LaGuna to create ‘T’-hole surgery!
This simple procedure will allow us to totally conceal the SPLITSTOP™ inside the bait, plus I’ll also be using a new system to attach the bait to the hair – without hair loops or barbed needles!
‘T’-hole surgery on meat is just a bit of light-hearted fun of course which is what fishing should be all about. But fishing also has its serious side too and as any experienced angler will tell you; big fish like specimen carp, barbel and chub will always demand our respect and although catching the big one is never guaranteed, we should always make sure our presentation is just right so that it makes catching them a little bit easier.
So don the surgeons cap and gown and let’s get down to theatre…
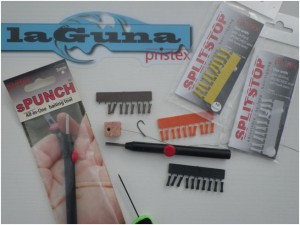
Budding cheese and meat specialist’s surgeons will require the following in which to practice their skills;

- Hooks of choice
- Meat or cheese (plain or flavoured – transfused)
- Hook link material (suture)
- The sPUNCH All-in-one baiting tool
- SPLITSTOP’s (for transplant)
- Sharp utility knife (scalpel)
- Rig tubing (IV line)
- Pretty assistant to mop your brow (optional)
The procedure:
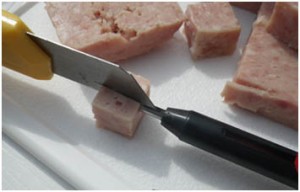
Cut a decent size piece of meat or cheese to the size you want for hair rigging.
Here I have cut some garlic spam which is a little over ½”square (about 15mm) for example, the shape of which can be altered later if you wish (a little cosmetic surgery perhaps?). Our main objective being to use a big enough piece in which to later hide the SPLITSTOP™.
 I don’t need to worry too much about the size of my bait if I’m going after specimen carp on commercials or big barbel and chub on the river as I know that some anglers, myself included, will often use bigger baits than this, sometimes up to a ¼ tin of meat on the hair as these fish are more than capable of taking large baits.
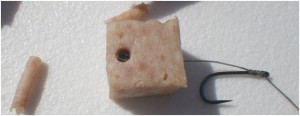
Having cut your bait to the size required, we will next use the sPUNCH™ to create two small holes in it – one horizontally to accommodate the SPLITSTOP™, and one vertically at a right-angle for the hair and rig tubing – ‘T’-hole surgery!
(The sPUNCH™ model shown below has a 20mm long steel tube)
Make the ‘T’
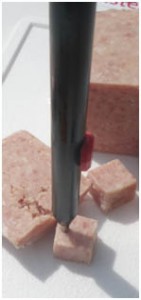
Use the sPUNCH™ to punch the first hole required.
- With the thumb slide pulled back; push the steel sPUNCH™ tube all the way through the middle of the bait set back about 3-4mm from one edge.
- Twist to make the cut (making sure that the slit in the steel tube is now facing forwards) and run your sharp knife (scalpel) down its length to make a small neat incision.
- If running your knife along doesn’t remove the punched meat, just push the thumb slide forwards to clear the hole.
- Withdraw the sPUNCH™ to leave a perfect 3mm hole which will be used later to conceal the SPLITSTOP™.
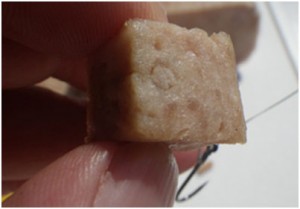
The incision made with the scalpel will be almost invisible as you’ll see later.

Hole (No.2) is made vertically at a right-angle to the first, but this time you only need to go part way through.
The reason for gauging the depth is so that we don’t puncture a hole through the slit at the other end.
Gauge your depth:
- Position the sPUNCH™ alongside your bait with the tip of the steel tube parallel with the centre of the first hole.
- Withdraw the thumb slide until the plunger is positioned at the end of your bait – this will gauge the depth required to punch the second hole needed for the hair and rig tubing.
- With the plunger now set at the correct depth; push the sPUNCH™ down through the middle of the bait at a right-angle to the first hole. Don’t go any deeper or you will go out the other end and puncture a hole through.
- Twist to cut, withdraw the sPUNCH™ and push the thumb slide forwards to extrude the contents, leaving it to one side for a moment as we may need it later to plug up any holes.
What we have done here is to create our two holes at right-angles to one another ‘T’-holes, one for the SPLITSTOP™ (for transplanting) and another for the hair/rig tubing (IV line), plus we have made a small incision with our sharp knife (scalpel) to provide an opening which will hopefully leave just a small scar when we’re done.
And who said anglers don’t have a sense of humour?
Like all good surgeons, we don’t want to leave any obvious big scars – Or cause our meat any stress!
Let’s suture up…
As expected; the operation went very well so now all that remains to be done is to stitch up!
Here we have two choices of attaching the bait to the hair namely;
- The traditional way – using a hair loop and baiting needle or;
- The new way – with the aid of the sPUNCH™ baiting tool!
The traditional way of baiting up is what most anglers are familiar with, so let’s briefly mention that first, and then later I’ll explain the new way which demonstrates perfectly how efficiently the sPUNCH™ and SPLITSTOP™ system works.
The traditional way of baiting up with a hair loop and needle needs little to no introduction as it’s been around since hair-rigging was first invented.
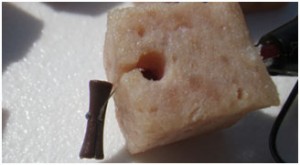
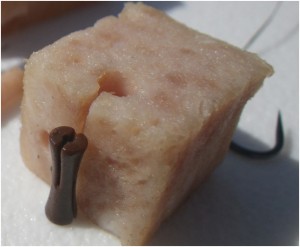
Basically for our purposes of hair rigging meat and cheese (‘T’-hole style) as illustrated throughout this article is to tie a knotless-knot and a hair loop – a double overhanded knot on the end of the hair (a surgeons loop – yes that’s what its actually called). Thread on a piece of rig tubing (optional) and pull the hair all the way through the bait with a baiting needle. Remove the needle and attach your bait stop (big SPLITSTOP’s™ are ideal in our case so that they don’t damage the bait when cast or when held back in a strong current*). Next pull back the hair slightly to conceal the SPLITSTOP™ into the horizontal hole No.1 made with the sPUNCH™ and finally; push your rig tubing down into hole No.2 to protect the bait from the hair cutting through.
The traditional way of baiting up with hair loops and baiting needles are familiar items to almost everyone who ties hair rigs.
Another option would be to open the SPLITSTOP™ slightly to transform it like this so that they resemble other meat stops you might already be familiar with.
This too is used with a hair loop though generally they are positioned outside of the meat rather than concealed within as we’re trying to do here.
*SPLITSTOP’s™ are 8mm long and are perfect for big baits and big fish, either opened out or used as a dumbbell but can easily be trimmed down with scissors or a nail clipper if your fishing for smaller species too.
The new way
First of all let me just say that there is nothing much wrong with the traditional way as explained above simply because it works and it will always continue to work. But there is now a new and alternative way which I would like to introduce to you as I believe it is much quicker than tying a hair loop (and safer if you don’t get on with needles) with the added benefit of securely attaching the SPLITSTOP™ to the hair – ONCE throughout your days fishing!
Anglers who aren’t familiar with the new SPLITSTOP’s™ won’t readily appreciate their many other advantages and features – not least those curious splits and their unique ability to adjust and alter the hair length on the fly – changing from long for barbel to very short for chub for example (without having to strip your rig down), no bulky knots to contend with that can potentially damage your bait as its being pulled through etc. as illustrated fully in the accompanying free booklet with your purchase.
This new system may sound strange but is surprisingly simple to do – although admittedly; probably not so easy to understand until you have tried it for the first time!
How does this system work?
You should only need to fix on a SPLITSTOP™ – Just ONCE!
Throughout the whole days fishing, no matter how many times you change bait…
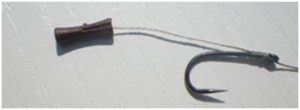
- If your using mono then go ahead and tie your hook using a knotless-knot but instead of tying a loop on the end of the hair, just pass the hair through the centre hole of a SPLITSTOP™ (the hole is 0.5mm diameter and runs all the way through) and blob the end with the flame of a lighter to melt it (test it with your finger and thumbnail when cooled to make sure it is firm and secure).
- If you prefer using braided hook link material that doesn’t melt, it’s probably best to just tie a single small knot first, tidy up the end with scissors and then tie on your hook using a knotless-knot.
Note: DO NOT tie a hair loop as it won’t work for this system.
With your hair now threaded through the centre hole, you will also notice two splits – one on each end of the SPLITSTOP™.
- Pass the blobbed end of the hair (or knot if you tied one) over the split end and pull it towards the middle of the dumbbell so that the blob sits snug and secure into the recess.
This procedure doesn’t require a hair loop so it’s quicker and less cumbersome – especially when your fingers are cold.
The hook link material I’m using here in these photos is Dyneema® PE braid .12 (17lb BS) which has been blobbed with a lighter.
All we need to do now is pass the (loop-less) hair through the bait with the SPLITSTOP™ already attached, and at this point you’re probably wondering how to do so without the aid of the familiar baiting needle?
It’s real easy…
- Place the SPLITSTOP™ with the hair attached into the sPUNCH™ tube and insert it into the last hole (No.2) created in the bait to the required depth gauged beforehand.
- Push the thumb slide forwards until the SPLITSTOP™ appears out the other end where you made the incision with your knife.
What you have essentially done; is used the sPUNCH™ as a baiting tool (instead of a barbed needle) to thread the hair through the hole with the SPLITSTOP™ already attached!
Let’s Hide it!
Generally speaking; some anglers like to use a brightly coloured or contrasting bait stop as a ‘sighter’ for the fish to home into, but I think the overall majority prefer disguising it or use one that will mimic a piece of corn etc. so as not to alarm the fish in anyway, while other anglers might opt for a neutral colour or one that closely matches the bait so as not to spook them. But for our purposes using big pieces of meat or cheese a small stop is impractical and a close matching colour is simply not good enough.
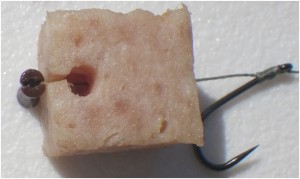
In fact colour, shape, shine and silhouette don’t even come into it for me personally – not if we can totally conceal the bait stop within the bait instead, then that’s what I would recommend.
- With the blobbed hair now secure; position the SPLITSTOP™ by orienting it to the incision made with the knife and pull the hair back slightly into the bait to conceal it into the hole No.1 made with the sPUNCH™
Tidying up
Hopefully you will appreciate some of the advantages of using the SPLITSTOP™ and sPUNCH™ or perhaps you will stick with the traditional way of baiting up with hair loops and needles?
Whatever way you decide, both will work, but there are still a couple of things we can do to further improve our presentation namely;
- Plug the ends of the holes still visible with the pieces of meat we removed earlier.
(As an alternative you could also plug meat with cheese, or cheese with meat, or some other cocktail perhaps?)
- You can also alter the shape of the bait by trimming off little pieces and breaking up the outlines?
- Permanently closing the incision with superglue? – It’s common practice in modern day surgery!
(Some anglers are known to use superglue on their knots for example, though personally I’m not sure the fish like the smell?)
All these little extras are optional of course, but unless you’re just fishing the nearside margins on a lake or gently trotting through on a lazy river, I would definitely recommend at the very least;
- Inserting some split rig tubing to protect the bait from being cut like cheese wire.
Hopefully I have shown that; with a little ingenuity and disguise, soft bait like meat and cheese can easily be made to withstand the rigors of casting. They can be held back in a strong current and can also be confidently inspected up close by big fish for any signs of doctoring – a stealthily presented bait with a big bait stop like SPLITSTOP’s™ and a little piece of rig tubing.
This small operation was a great success – you have just done ‘T’-hole surgery!
Have your pretty little assistant mop your brow for a job well done…
sPUNCH™ and SPLITSTOP™
Available exclusively online from: LaGuna
May all your fishes be bigger tomorrow!
The three photos above show the traditional way of baiting up using hair loops and a barbed needle
Tools required for creating “T”-hole surgery!










Leave a Reply